
Digital Dentistry is gaining more and more space in the universe of oral health, and how to create 3D models in Digital Dentistry with Meshmixer software is a valuable skill for professionals in the sector. In this article, you'll learn how to master this powerful tool and create amazing 3D models to take your dental practice to the next level.

What is the Meshmixer and how does it revolutionize Digital Dentistry?
Meshmixer is a free and versatile software, developed by Autodesk, that allows you to easily create and edit 3D models. In the field of Digital Dentistry, it stands out for enabling the creation of accurate and personalized 3D models of teeth, prostheses and implants.
- How to create 3D models in Digital Dentistry with the software Meshmixer: Step by step
Now that you know what Meshmixer is, let's dive into the process of how to create 3D models in Digital Dentistry with Meshmixer software.
2.1. File import and preparation
- Download and install Meshmixer on your computer;
- Import the patient's CT or MRI file;
- Convert the file into a 3D model using the “Generate Face Group” function;
2.2. Project editing and modeling
- Use editing tools such as sculpting, cutting and sewing to customize the 3D model;
- Create specific prostheses and implants for each case, using the Meshmixer object library;
Meshmixer is a powerful and versatile tool for creating 3D models in a variety of formats, including the popular .STL (Stereolithography) format. Here is a detailed guide on how to use Meshmixer to create a 3D .STL model:

- Install and open Meshmixer
Download Meshmixer from Autodesk official website and install it on your computer. After installation, open the program.
- 3D model import
Click “Import” in the upper left corner of the screen and browse to the 3D model file you want to work with. Meshmixer supports a wide range of file formats such as .PLY, .OBJ, .AMF and .3MF.
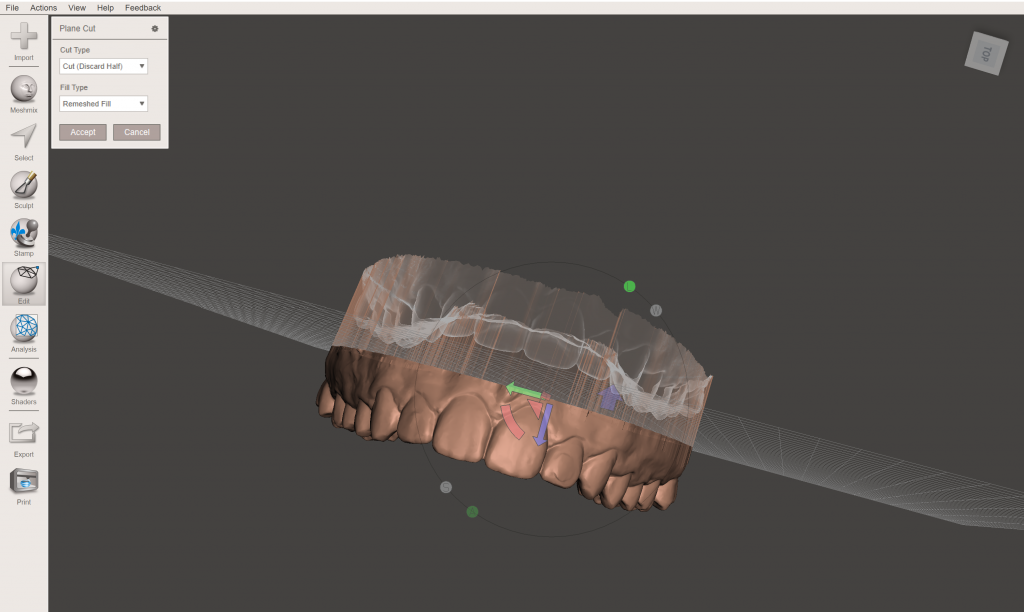
- 3D model editing
With the 3D model imported, you can use Meshmixer's many editing tools to adjust and customize the object. Some of the main tools include:
- Select: Allows you to select specific parts of the model for editing.
- Transform: Allows you to move, rotate, and scale the object.
- Sculpt: Allows you to sculpt and shape the model with various tools such as brush, flattening and smoothing.
- Edit: Provides options such as cutting, stitching and merging different parts of the model.
Explore Meshmixer's tools and functions to enhance your 3D model according to your needs.
- Model check and repair
Before exporting your 3D model to .STL format, it's important to make sure it's print ready. Meshmixer has a tool called “Analysis” that allows you to identify and correct common problems such as holes, overlaps and very thin walls. Use this feature to ensure your template is ready to print.
- 3D model export to .STL
Once you have finished editing and verifying your 3D model, go to “File” in the top left corner and click “Export”. In the window that opens, choose the .STL file format and select the location where you want to save the exported file. Click “Save” to finish the export.
You now have a 3D model in .STL format, ready to be used in projects or printed on a compatible 3D printer. Meshmixer offers numerous possibilities for working with 3D models in the area of dentistry and in many other sectors. With practice and dedication, you can master Meshmixer and make the most of its features!
2.3. Export and 3D printing
- Export the finished 3D model to a format compatible with 3D printers;
- Print the model using a high quality dental 3D printer.
- Tips and tricks to perfect your work in Meshmixer
- Practice and explore the software's features to familiarize yourself with the available tools;
- Stay up-to-date on the latest Meshmixer updates and news;
- Collaborate with fellow professionals to share tips and experiences.
FAQs:
- Is it difficult to learn how to create 3D models in Digital Dentistry with Meshmixer software? With practice and dedication, you can master the Meshmixer and create amazing 3D models for your dental practice.
- How long does it take to create a 3D model in Meshmixer? The time required varies depending on the complexity of the project and user experience.
- Is the Meshmixer compatible with other Digital Dentistry tools? Yes, Meshmixer can be used in conjunction with other Digital Dentistry software to create even more accurate and personalized 3D models.
Conclusion 3D Model and Meshmixer Digital Dentistry
Mastering the art of creating 3D models in Digital Dentistry with Meshmixer software is a valuable skill that can help dental professionals stand out in the market. With the steps in this article and a little practice, you'll be ready to create stunning 3D models and take your practice to the next level.
Investing time and effort in learning the Meshmixer is undoubtedly a smart bet for anyone who wants to stay current and competitive in the field of Digital Dentistry. Make the most of this powerful tool's functionality and see how it can transform your approach to oral health and caring for your patients.
Now that you know how to create 3D models in Digital Dentistry with the Meshmixer software, it's time to get your hands dirty and explore the endless possibilities that this tool offers. Good luck and good studies!

Pingback: What are the most used files and programs in digital dentistry? -